 Remote
Computer Options (Client Options)Remote
Computer Options (Client Options)
Remote
Computer Options (Client Options)Remote
Computer Options (Client Options)To change settings of Net Control 2 Client remotely:
select computers in the Administrator Console;
click menu command N -> Options -> Remote Computer Options.
To change settings of Net Control 2 Client on student computer:
click Net Control 2 (N) icon in the System Tray;
then click Configure menu command from the appeared menu.
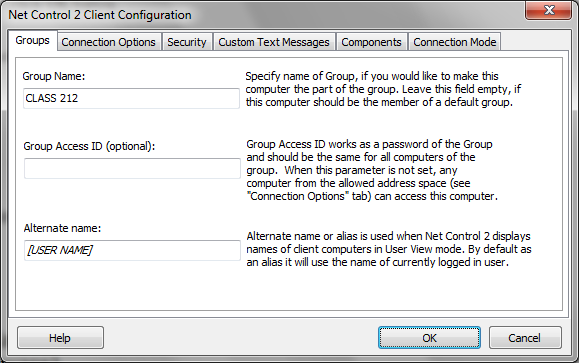
Group Name – Group Name to which the computer belongs. For more information about groups, please see Chapter I.
Group ID – Group ID (password) for the current group. For more information about groups, please see Chapter I.
Alternate Name – this name will be displayed when Administrator switches view mode from Computer Name View to User Name View. If it is left blank or [USER NAME] value is specified, the name of currently logged in user will be displayed.
Connection Options:

Filtering – controls access to this computer by verifying IP address of connecting teacher computer, and blocking the connection if IP address is not in the list of allowed addresses.
Not specified connections are allowed – when checked, all connections not specified in the list will be enabled. If it is not checked, all connections not listed will be blocked.
Click Add, Edit or Delete buttons to add, modify or delete IP address or name to the list.
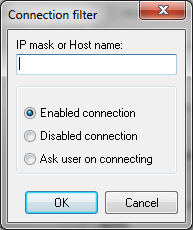
IP mask or Host name – specify one IP address, first digits of IPv4 address or DNS name of computer, e.g. 192.168.0.1, 192.168.1, COMPUTER01
Mark this connection as:
Enabled connection– the connection is enabled.
Disabled connection – the connection is blocked.
Ask User on Connecting – when this option is chosen, on each attempt of connection from the specified address, Net Control 2 User Module will prompt “Connect computer NNN?”. Access is available only when the user confirms the connection.
“Allow control from This computer only” button adds IP addresses of Administrator computer to the list of allowed connections.
Allow local connections only – when checked, Net Control 2 will enable only those connections which were made from current network, i.e. first digits of IP address on both computers are the same.
Attach
service to the following network adapter
- here you can choose a network adapter where Net Control 2 service
will be enabled. This option is useful when the computer has several
network adapters.
Example:
if your computer has access to a local network through a LAN Adapter
and to the Internet through a WAN Adapter, you can select the first
one to make Net Control 2 service available only within bounds of
local network.
Ports:
Network port - (TCP/IP, by default — 2012). Please change this value ONLY if Net Control 2 software interfere with other software in your network.
Remote Desktop port — AUTO value is recommended. Change this value only if default ports interfere with other software in your network. The same value should be the set up on both Administrator and User computers. On the Administrator side, this value may be set up in N -> Options -> Control Options -> Connections tab.
Use Multicast for Search routines – disable this option if Multicast protocol is not supported by your network.

Administrator password used when a user attempts to change the settings of Net Control 2 Server or clicks the menu commands "Stop" or "Exit". We recommend setting up this parameter if you would like to prevent stopping Net Control 2 service or unauthorized configuring the service.
Disable System Tray Menu – when checked, Net Control 2 disables all commands in Net Control 2 System Tray Menu, except About menu command (available in the registered version only). System Tray icon will not be disabled.
Signal On Connection - when checked, any connection of administrator computer will be accompanied by sound signal and text message.
PERMISSIONS – allows limiting the functionality of service. When permission is disabled, all features related to this permission will be disabled:
Allow changing Server settings remotely - when this permission is set, the Administrator can change Server settings remotely via the Net Control 2 Client.
Control Desktop objects - permission for controlling the Desktop of the user computer remotely, receive screenshots, run Remote Desktop and Broadcast Desktop sessions, change resolution, etc.
File Operations - permission for file operations between computers. When additionally, "On the specified folder only" option is set, all file operations may be performed within the specified folder only.
Control programs - permission to execute and terminate programs and services remotely.
Shutdown, restart, lock - permission to perform power-related operations, like shutdown, reboot, stand-by etc., and lock and unlock computer remotely.
Receive messages - permission to receive messages from the Administrator computer.
Log Events - permission for Events Watcher and Events Logger tools.
Change system settings - access to Registry, Policies, and access to the Internet etc.
Allow Help Requests - when enabled, user can send Help requests to Administrators via Net Control 2 Server menu.
Log Chats History – chat history will be logged in C:\Users\YOURLOGINNAME\AppData\Roaming\Net Control 2\nc2chat.log for Net Control 2 MiniChat and in C:\Users\YOURLOGINNAME\AppData\Roaming\Net Control 2\nc2cchat.log file for Chat tool.
Do not reply to scan requests – when enabled, the computer will not respond to a teacher computer, when it scans the network for computers.
Full screen message prompt – defines a message, which will be displayed in a full screen message window at the bottom of that window.
Show Use policy at startup – when enabled, the client module will display the Acceptable Use Policy or other document, which the user should accept.
Warn before shutdown operation – when enabled, the client will warn a user, when remote shutdown operation is pending. The prompt will be displayed in 20 seconds before the operation will be applied.
Flip web-camera snapshot vertically – depending on the web-camera driver settings, sometimes an image captured from a web-camera may be flipped vertically, and this behavior cannot be discovered by the software automatically. To fix this issue, you can either change settings of the web-camera, or if it is impossible, to use this option to restore the normal appearance.

Internet Control Engine – manage the installation of the Internet Control Engine. Setting any option, except “Do nothing”, will schedule the installation routine. Do not change this value unless you need re-install the Internet Control Engine.
Install as Internet Explorer Plug-in – schedules installation of the Net Control 2 Internet Control Engine as a plug-in for Internet Explorer. This mode is most compatible with third-party software, but allows controlling Internet traffic in Internet Explorer only.
Install as Protocol Layer — schedules installation of the Net Control 2 Internet Control Engine as a Protocol Layer. This mode is less compatible with third-party software than IE plug-in mode, but provides additional functionality and does not depend on Internet clients (browsers, e-mail clients etc.)
Uninstall both - Internet Control Engine will be uninstalled from the User computer. You can use this option if Net Control 2 software conflicts with other software installed on User computers. All Internet-controlling features will be disabled.

Quiz Player:
Show in Full-screen – when enabled, quizzes will be played in full-screen window.
Show as Topmost window – when enabled, the user will not be able to switch to other programs during quizzing.

Mode - option determines what types of connections are allowed for this computer
Incoming connections only – only standard connections of Net Control 2 Administrator are available
Incoming
and User connections –
(default) - both standard and user-connect connections are allowed.
User
connections are
connections, made by the User module, to the specified in its
configuration IP address or network name of Administrator computers.
These addresses/names should be listed at right pane (Specify
IP address or network name of Administrator Servers field).
User connections only – only user-connections are allowed.
Stop service at startup – the service is not enabled at startup. To enable the service, the User either needs to resume the service by clicking on the Resume Service command in Net Control 2 System Tray menu or to connect Administrator computer by using the Connect computer command. This mode is default for Start by Request mode as specified in Chapter C.
Additional options:
Terminal Server sessions support – enable if you need to add support of terminal sessions or thin client sessions on this computer. In addition, “Incoming and User connections” or “User connections only” mode should be used and at least one address of teacher computer should be specified in the “Specify IP address…” field.
Show Close Connection Toolbar – when enabled, special “Close Connection” toolbar will be displayed on the User Computer, if the connection was initiated by the User, via Connect Computer Tray Menu's command or via Student Registering window.
Enable Connect Computer Menu command – when enabled, the Connect Computer command of Net Control 2 Tray Menu will be enabled, so the user will be able to connect to the Administrator computer, specifying its IP address or network name.
Student Registration: registration is required – when enabled, Student Registration window will be displayed in a full-screen window, which prevents switching to other programs until student registers in the system.
Student Registration: prompt at Windows startup – when enabled, Student Registration window will be displayed at the Windows startup immediately after the user logs on to the system.
Control/Broadcast tab defines settings for Remote Desktop and Broadcast Desktop engines. These settings should correspond to Remote Desktop and Broadcast Desktop settings, specified in Control Settings (on Control/Broadcast page). For more information please refer to the Control Options chapter.